Description
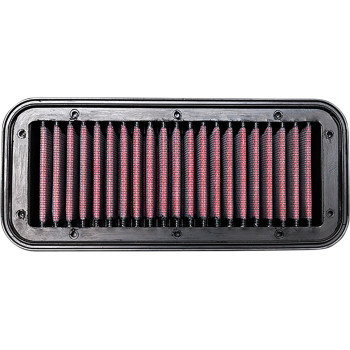
Indian Challenger Pursuit High Flow Air Filter 2020 – 2022
- 4-ply washable filter media for better filtration 20% increase in flow
- Made in the U.S.A.
| PRODUCT NAME | AIR CLEANER |
| MODEL | HIGH-FLOW |
| AIR CLEANER SHAPE | RECTANGULAR |
| COLOR/FINISH | RED |
| BASE COLOR | BLACK |
| FILTER MEDIA MATERIAL | COTTON GAUZE |
| MATERIAL | BILLET ALUMINUM |
| FEATURES | REUSABLE / WASHABLE |
| UNITS | KIT |
| RIDING STYLE | STREET |
Always wear safety glasses and nitrile gloves when servicing your Indian Motorcycle. To inspect or replace the air filter on your Indian Challenger, follow these steps:
1. Park the bike on a flat, level surface and allow the bike to cool completely.
2. Remove both upper side panels by pulling away from the vehicle to release the grommets.
3. Next, remove the fuse panel and locate the fuel pump relay to depressurize the fuel system.
4. Start by removing the fuel pump relay.
5. Then crank the engine for five seconds to relieve fuel pressure.
6. Remove the left-hand V-cover by removing its three fasteners with a 5mm Allen socket.
7. Wrap a clean shop towel around the fuel line fitting.
8. Squeeze and hold both release buttons on each side of the fitting and carefully slide the fitting straight off the fuel rail. Avoid using tools for this connection to prevent damage to the fitting.
9. Remove the seat mount fastener on each side of the seat with a 6mm Allen socket.
10. Pull the seat rearward to disengage the mounting, avoiding contact with the rear fender.
11. At the rear of the tank, rotate the fuel pump connector out of its holder and disconnect.
12. Remove the two fuel tank fasteners with a 6mm Allen socket.
13. Carefully disconnect the fuel vent line.
14. Lift the rear of the tank upward and pull rearward to remove. Place the fuel tank in a secure location and use care to avoid any spills.
15. Remove the harness zip ties and the brake line retention clips covering the airbox. Place the wiring harness and the brake lines out of the way.
16. Clean the area around the air filter.
17. Remove the four airbox filter cover fasteners with a 6mm Allen socket.
18. Pull the airbox cover out to remove from the bike and inspect the cover seal. Replace if needed.
19. Next, remove the air filter and inspect for any excessive debris or damage. If necessary, replace with an Indian Motorcycle-approved air filter from your dealer. Do not attempt to clean the air filter.
20. Clean the airbox thoroughly. Dirt or debris in the intake tube could result in severe engine damage.
21. Install the air filter into the airbox, ensuring it is oriented properly for the airbox cover.
22. Next, reinstall the cover. Torque the fasteners to 84 in-lbs (10 Nm).
23. Reinstall the brake lines and wiring harness into the cover retentions.
24. Install new zip ties on the brake lines and wiring harness.
25. Verify all cables and lines are secure and properly routed.
26. Make sure the forward tank isolators are fully seated and free of any debris or damage.
27. Also, ensure the rear tank isolators are installed properly and free of any damage.
28. Using a clean cloth to protect the finish, reinstall the fuel tank on the chassis and slide forward until fully seated on the isolators. Also ensure the rear tank isolators are installed properly and free of any damage. Lower the rear of the tank into position over the rear mounting bracket.
29. Install the fuel tank fasteners. Torque to 18 ft-lbs (24 Nm).
30. Next, carefully reinstall the fuel vent line.
31. Reconnect the fuel pump electrical connector and rotate back into its holder.
32. Connect the fuel feed line to the fuel rail. There should be an audible click when pressing into place. Pull back gently to ensure a proper connection has been made.
33. Reinstall the fuel pump relay with the words facing outward and reinstall the fuse panel cover.
34. Prime the fuel system by turning the power button ON, waiting five seconds and then turning it OFF. Once the system is pressurized, carefully check all fuel connections, joints and lines for leaks.
35. Install the left side V-cover. Torque the fasteners to 84 in-lbs (10 Nm).
36. To reinstall the seat, engage the front and rear mounting tabs on the seat to their mounting points on the frame.
37. Then reinstall the seat fasteners. Torque to 18 ft-lbs (24 Nm).
38. Align the upper side panels by engaging the three grommets in the chassis frame.
39. Finish by starting the bike to ensure proper operation.
